Are you tired of your kitchen utensils getting in the way while cooking? A spoon holder ceramic is a practical and stylish solution to keep your spoons and other cooking tools within reach. Plus, it adds a touch of elegance to your kitchen decor.
How to make a ceramic spoon holder is a fun and rewarding project that combines creativity with functionality. Whether you’re a beginner or experienced in pottery, this guide will walk you through the steps to craft a unique piece that adds a personal touch to your kitchen. Ceramic spoon holders help organize your cooking tools and serve as a practical and decorative addition to your countertop.
With just a few materials and basic techniques, you can design a spoon holder that reflects your style and complements your kitchen décor.
What Are the Benefits of a Ceramic Spoon Holder?
Aside from keeping your kitchen organized, a ceramic spoon holder offers various benefits that make it an essential addition to any kitchen. Here are some advantages of using a ceramic spoon holder:
- Durability: Ceramic is a sturdy and long-lasting material, making it perfect for everyday use in the kitchen.
- Heat-resistant: Since you’ll most likely be placing hot utensils on the spoon holder while cooking, ceramic’s heat resistance makes it a safe option.
- Easy to Clean: Ceramic is non-porous, so it won’t absorb food stains or odors. You can easily wipe it down with soap and water after each use.
- Versatile Design: Ceramic comes in various colors and designs, making it easy to find one that matches your kitchen’s aesthetic.
- Eco-friendly: Using a ceramic spoon holder reduces plastic or other non-biodegradable materials, making it an eco-friendly choice for your kitchen.
What Will You Need?
Before you start making your ceramic spoon holder, gather all the necessary materials. Here’s a list of essential tools and supplies:
- Clay: Choose a type of clay suitable for hand-building, such as stoneware or earthenware.
- Potter’s Wheel: If you have experience using a potter’s wheel, you can use it to shape the spoon holder.
- Slab Roller: A slab roller is a tool used to roll out clay into even slabs, which will be used to create the base and sides of the spoon holder.
- Clay Cutter or Knife: Cut the clay slabs into desired shapes and sizes.
- Sponge: For smoothing and shaping the clay.
- Clay Rib or Wood Tool: To create texture or patterns on the surface of the spoon holder.
- Glaze: Glaze is a liquid mineral mixture that gives ceramic its color and surface finish. You can choose from glaze colors, such as glossy, matte, or metallic finishes.
- Kiln: A kiln is used to fire the ceramic pieces. If you don’t have access to one, you can also use air-dry clay for this project.
8 Easy Steps on How to Make a Ceramic Spoon Holder
Step 1. Prepare the Clay:
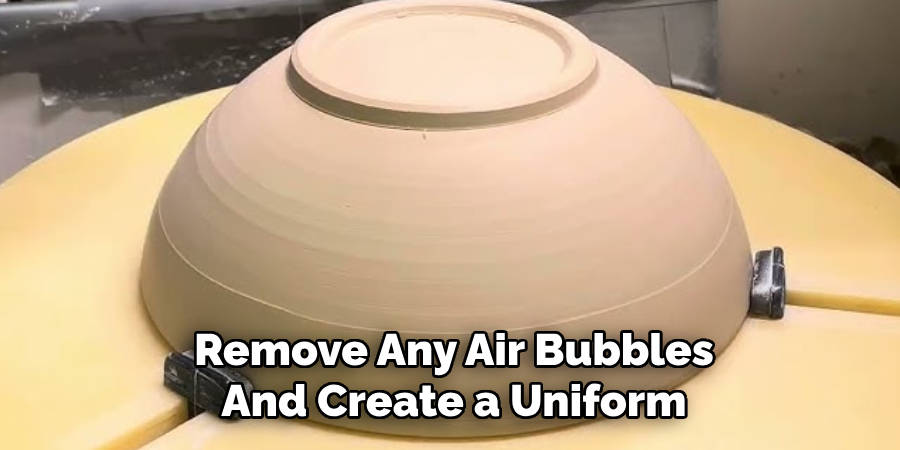
Start by selecting the type of clay you wish to use, such as stoneware or earthenware. If using block clay, knead it thoroughly on a clean, dry surface to remove any air bubbles and create a uniform consistency. This process, known as wedging, ensures the clay is workable and prevents cracking during the drying or firing process. If you’re using pre-rolled slabs, make sure they are smooth and even in thickness. Use a damp sponge to lightly moisten the surface of the clay if it feels too dry, which will help in shaping and handling later on.
Once the clay is well-prepared, set it aside on a clean, non-stick surface like a canvas board, and cover with plastic wrap to prevent it from drying out while you prepare for the next steps. Take your time with this step, as properly prepared clay is the foundation for a successful ceramic project.
Step 2. Roll Out the Clay:
Once your clay is adequately prepared, roll it out evenly using a rolling pin or a specialized clay roller. Place wooden dowels or rolling guides of equal thickness on either side of the clay to ensure uniform thickness. Aim for a thickness of about 1/4 inch, as this provides enough durability while still being easy to shape. Rotate the clay periodically as you roll to maintain a symmetrical and even surface. If needed, sprinkle a small amount of cornstarch or place the clay between sheets of parchment paper to prevent sticking. Smooth out any imperfections with your hands or a damp sponge before moving on to the next step.
Step 3. Cut and Shape the Clay:
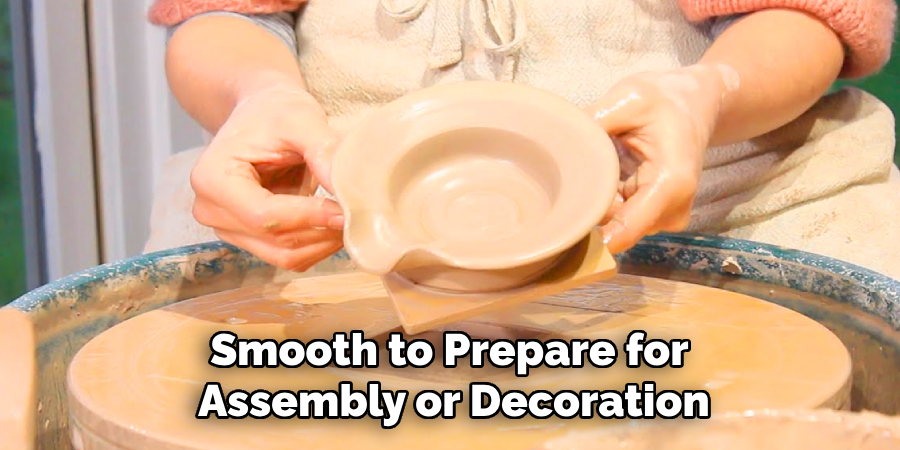
Cut the clay into your desired shape using a sharp clay knife, cookie cutters, or custom templates. Ensure the edges are clean and smooth to prepare for assembly or decoration. If you’re making a more intricate design, use sculpting tools to refine the details or add texture. For larger projects, consider cutting out smaller pieces and joining them together later. Keep a damp sponge nearby to moisten the edges and prevent cracks as you work. When satisfied with the shape, carefully transfer the clay piece to a firm, non-stick surface to prepare for the next step.
Step 4. Dry the Clay:
Once your clay piece is shaped to your satisfaction, allow it to dry properly. Place the piece on a flat, non-stick surface in a well-ventilated area, away from direct sunlight or heat sources, which could cause uneven drying or cracking. Drying times will vary depending on the thickness and type of clay but generally range from 24 to 72 hours. Consider flipping them occasionally for larger or thicker pieces to ensure even drying on all sides. Be patient during this step, as rushing the process can compromise the durability of your final creation.
Step 5. Sand and Smooth the Surface:
After fully dries the clay, inspect your piece for any uneven edges or rough surfaces. Use fine-grit sandpaper to gently sand the piece, working in small, circular motions to achieve a smooth finish. Don’t apply too much pressure, as dried clay can be brittle and prone to chipping. Once satisfied with the surface texture, wipe away any excess dust with a soft, damp cloth. This step ensures your project looks polished and professional, preparing it for the next stage, such as painting or sealing.
Step 6. Paint and Seal Your Piece:

Once your clay piece is smooth and dust-free, it’s time to add color and protection. Use acrylic paints for vibrant, long-lasting results, and apply them evenly with a fine brush. Allow the paint to dry completely before adding a sealant. Choose a clear varnish or matte sealant for sealing, depending on your desired finish. This step not only enhances the appearance of your creation but also adds a layer of protection, making it more durable and resistant to wear. Ensure the sealant is fully dried before handling your finished piece.
Step 7. Display or Use Your Creation:
With your piece fully painted, sealed, and dried, it’s ready to shine! Choose a suitable location to display your work, such as a shelf, desk, or curated art space. If your clay piece serves a functional purpose—like a bowl or jewelry holder—ensure it is used gently to preserve its finish. Sharing your completed creation with friends or on social media is an excellent way to showcase your effort and inspire others. Celebrate your artistic achievement and start brainstorming your next clay project!
Step 8. Clean and Store Your Supplies:
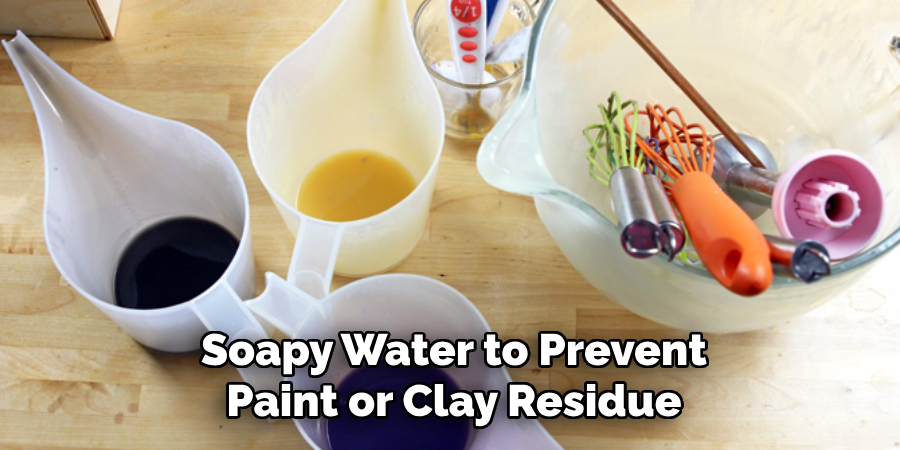
After completing your project, take the time to clean your tools thoroughly. Wash brushes, palettes, and other reusable tools with warm, soapy water to prevent paint or clay residue from hardening. Allow them to dry completely before storing them. Properly organizing your supplies, such as keeping paint in closed containers and tools in a designated storage space, ensures they remain in good condition for future use. This step makes your next creative endeavor more enjoyable and keeps your workspace tidy.
By following these steps and taking your time to properly prepare, shape, and finish your clay project, you can create a beautiful and durable piece of ceramic art.
5 Things You Should Avoid
1. Skipping the Proper Tools: Using improper tools can result in uneven surfaces or cracks during the crafting process. Ensure you have the right sculpting tools, rolling pins, and clay knives for precision and consistency.
2. Ignoring Clay Consistency: Working with too dry or too wet clay can lead to structural issues. Always check and adjust the moisture level of your clay before starting to avoid breakage or deformation.
3. Rushing the Drying Process: Drying the ceramic spoon holder too quickly, such as placing it in direct sunlight or near intense heat, can cause cracks. Patience is key for even and thorough drying.
4. Overlooking Proper Smoothing: Failing to smooth out edges and surfaces can leave your spoon holder feeling rough and unpolished. Take time to refine your piece before firing it in the kiln.
5. Neglecting Kiln Temperatures: Improper kiln settings can ruin your work. Follow the recommended temperature guidelines for your type of clay and glaze to ensure a durable and finished piece.
Conclusion
How to make a ceramic spoon holder requires both patience and attention to detail, but the process can be incredibly rewarding.
You can ensure a high-quality result by carefully selecting your materials, maintaining proper clay consistency, and taking the time to refine and dry your piece. Additionally, being mindful of kiln temperatures and following firing instructions will help you achieve a durable and beautifully finished spoon holder.
With these steps in mind, you can enjoy the satisfaction of crafting a functional and artistic piece that adds a personal touch to your kitchen.
Professional Focus
Harry Ciotti is a highly skilled kiln operator with a sharp eye for detail and an in-depth understanding of the firing process. His expertise ensures that each ceramic piece reaches its full potential, perfectly balancing strength and beauty. Harry takes pride in overseeing the final stage of pottery creation, transforming raw clay into durable and stunning works of art.
About the Author
Harry Ciotti is a dedicated kiln operator and ceramic artist who brings passion and precision to every piece he fires. With a deep commitment to craftsmanship, Harry ensures that every ceramic creation is fired to perfection, from delicate vases to robust sculptures. He not only operates the kiln, but understands the unique needs of each piece, ensuring it reaches its full artistic potential. Through his work, Harry blends precision with artistry, making every firing a story of transformation.
Education History
University: California College of the Arts
Degree: Master of Fine Arts in Ceramics
Harry’s advanced education in ceramics has refined his technical skills, particularly in kiln operation, firing processes, and ceramic artistry. His educational background equips him to produce top-quality ceramic pieces that reflect both technical excellence and artistic expression.
Expertise:
- Kiln Operation and Firing Techniques
- Ceramics Creation (Functional and Artistic)
- Precision Craftsmanship
- Glazing and Texture Techniques
- Ceramic Artistry and Storytelling